
Images are below the minimum resolution, even at 300 DPI
The DPI number stored in an image file is a label, not a measurement. What the printer checks is effective resolution: pixel width divided by the width the image actually prints at. A 1800 pixel wide photograph is 300 ppi across 6 inches and 200 ppi across 9. Ingram refuses interior images under 72 ppi and may refuse cover images under 200 ppi, with 300 ppi the target and 600 ppi for line art.
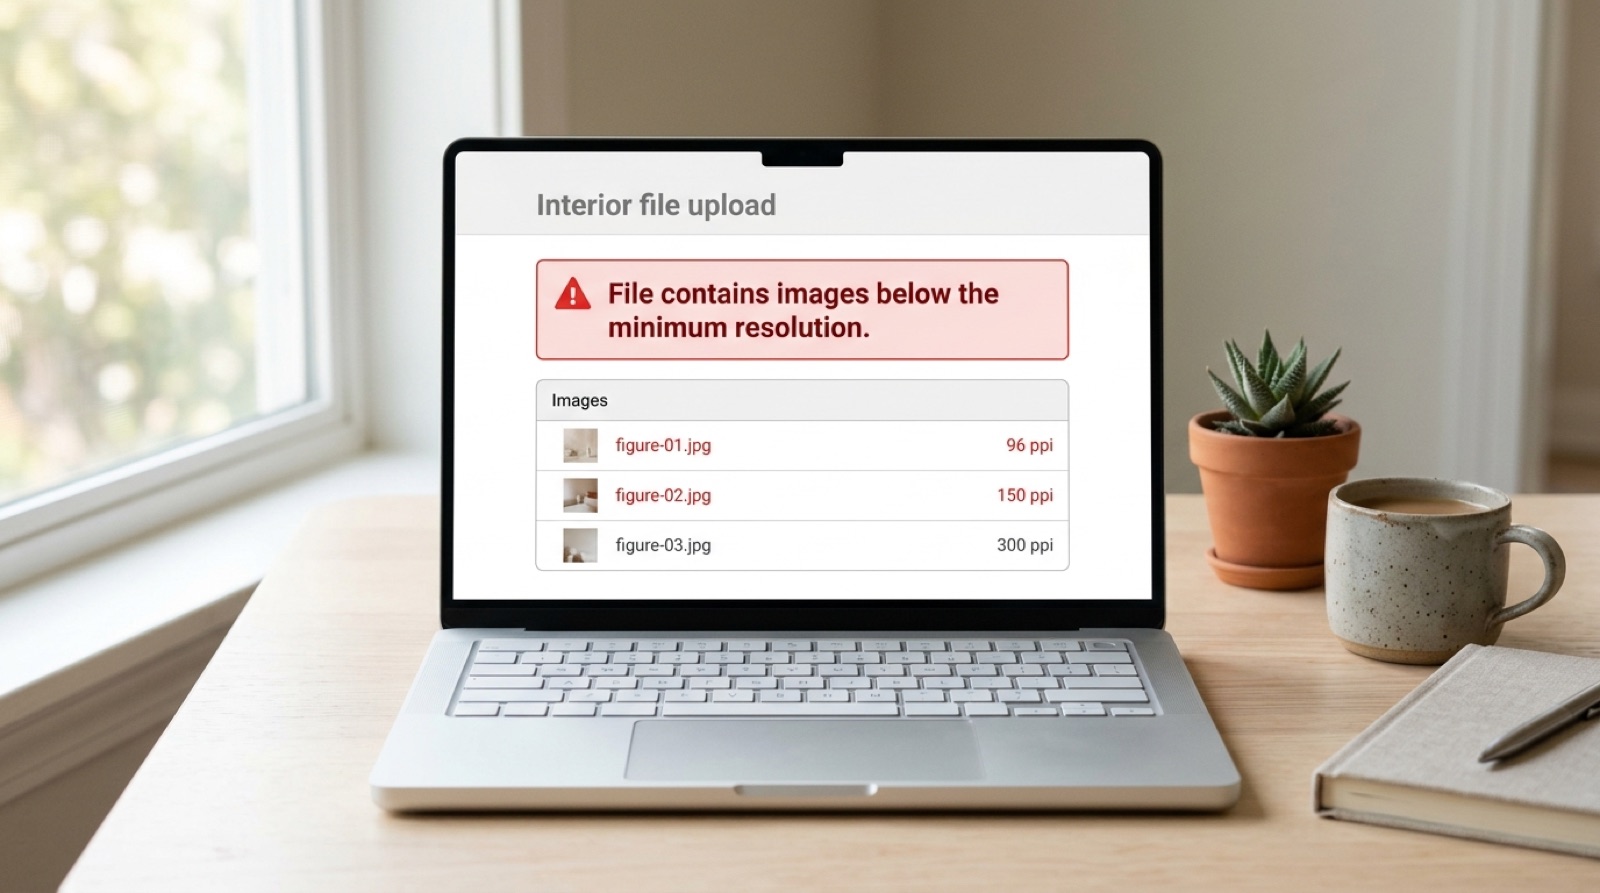
File contains images below the minimum resolution.
This is the rejection that produces the most disbelief, because the author has usually already checked. The image properties say 300 DPI. Photoshop says 300 DPI. The file came from a stock library that advertises 300 DPI. And the printer still refuses it.
The explanation is that the number stored inside an image file is a label, not a measurement. What the printer checks is a different number, calculated after your layout decides how large the image will actually print. That calculated number is called effective resolution, and it is the only one that matters.
DPI is not a property of your image
An image file contains a grid of pixels. A photograph that is 1800 pixels wide contains 1800 pixels of real information and nothing you do in a dialog box changes that count.
The DPI value written into the file is metadata: a stored suggestion about how large the image was once intended to print. You can open any image, type 300 into the resolution field, save, and the file will now claim 300 DPI while containing exactly as much detail as it did before. Stock libraries and camera software set this field to whatever they like. It tells you nothing about whether the image is good enough for your book.
Resolution only becomes real at the moment you place the image on a page and decide how wide it will be. At that point the arithmetic is fixed.
Effective resolution = pixel width divided by printed width in inches. A 1800 pixel wide image placed across 6 inches prints at 300 ppi. The same image stretched across 9 inches prints at 200 ppi. Nothing about the file changed. The page did.
The same image at four sizes
One 2400 by 1600 pixel photograph, which most people would describe as a large image, placed at different widths:
| Printed width | Effective resolution | Result |
|---|---|---|
| 4 in | 600 ppi | More detail than the press can use |
| 8 in | 300 ppi | On target |
| 12 in | 200 ppi | Soft, and refused on a cover |
| 24 in | 100 ppi | Visibly pixelated |
This is why a cover fails more often than an interior. A cover wrap for a 6 by 9 in paperback is around 12.5 inches wide before bleed, so a background image has to span the whole spread. An image that was comfortably sharp as a 4 inch figure inside the book falls apart when it has to cover the front, the spine and the back.
What the printers actually require
Ingram publishes one specification covering both IngramSpark and Lightning Source, and the floors differ by file type rather than being a single 300 DPI rule.
| File | Target | Rejection floor |
|---|---|---|
| Interior, continuous tone | 300 ppi, 8-bit grayscale | Under 72 ppi refused |
| Interior, line art | 600 ppi, 1-bit | Under 72 ppi refused |
| Interior, color | 300 ppi CMYK | Under 72 ppi refused |
| Cover | 300 ppi CMYK | Under 200 ppi may be refused |
Amazon KDP recommends 300 DPI at final printed size and treats anything below 200 DPI as low resolution. KDP also notes that there is no defined maximum, but images with extremely high resolution can cause processing timeouts, which is worth knowing if you are tempted to solve this by exporting everything at 1200 ppi.
The gap between the two sets of numbers is the thing to notice. A cover can be refused outright at 200 ppi while an interior figure at the same resolution passes the automated floor and simply prints badly. Clearing the floor is not the same as being good enough.
Why 300, and why 600 for line art
Interiors print at a 175 line screen, which is the frequency of the halftone dots that turn a continuous photograph into something a press can reproduce. The long-standing rule in commercial print is to supply around twice the line screen, which puts the target near 300 ppi. Going far beyond that adds file size and processing time without adding anything a reader can see.
Line art is different because it has no halftone. A 1-bit image is pure black and white with no intermediate tones, so every edge is defined by the pixel grid itself, and a diagonal line at 300 ppi shows visible stair-stepping. Doubling to 600 ppi is what keeps scanned diagrams, maps and pen drawings looking like lines rather than staircases.
Where low resolution comes from
Almost every case traces back to one of these.
- An image saved from a web page. Images on the web are sized for screens, so a picture that fills a browser window is often 1000 to 1500 pixels wide, which is a 3 to 5 inch photograph in print.
- A logo supplied as a PNG or JPEG rather than as vector artwork. Author logos, publisher marks and award seals arrive this way constantly, and a 400 pixel wide seal cannot print at any useful size.
- A screenshot. Screenshots are captured at screen resolution, which is far below print resolution, and no amount of enlarging recovers the difference.
- An image generated by an AI tool at its default output size. Many default to around 1024 pixels square, which is a 3.4 inch image at 300 ppi.
- A photograph that has already been emailed or sent through a messaging app, both of which routinely recompress and shrink images without telling anyone.
- A stock image bought at the small or medium size rather than the large one, which is a decision made months earlier by whoever was watching the budget.
Why upscaling does not rescue it
Enlarging an image asks software to invent pixels that were never captured. Classic interpolation fills the gaps by averaging neighboring pixels, which produces a larger image that is smoother and blurrier than the original rather than a more detailed one. The detail is not hiding in the file. It was never recorded.
Modern AI upscalers are better at this and genuinely useful at moderate enlargements, because they hallucinate plausible detail rather than averaging. They are still inventing. On a photograph of a person, invented detail is the risk: an upscaler will happily redraw an eye or a piece of lettering into something that was not there. For a cover image that will be printed thousands of times, that is a gamble with a visible downside.
The reliable fix is the dull one. Go back to the original capture, the original file from the photographer, or the full-size version from the stock library. If none of those exist, the honest answer is often to use the image smaller or to use a different image.
How to check before you upload
Checking each image by hand is slow and unnecessary. Both of the normal production tools report effective resolution directly.
- In InDesign, open the Links panel and turn on the Effective PPI column. It lists every placed image with both its actual PPI and its effective PPI, and the effective number is the one to read. Anything under 300 on a page that matters needs attention.
- In Acrobat Pro, go to Tools, then Print Production, then Preflight, and run a profile that checks image resolution. The report lists each offending image and the page it sits on.
- For a quick sanity check without either, divide the pixel width of the image by the width in inches you are printing it at. If the answer is under 300, you have your answer.
Do this before the interior is final rather than after, because replacing an image can change how text flows around it, and a reflow changes the page count, which changes the spine width on a cover you may already have approved. We have written about that chain in why your spine width changed when you did not touch the cover.
Why it looks perfect on your screen
A display shows an image at somewhere between roughly 100 and 220 pixels per inch depending on the hardware. Print resolves two to three times finer than that. An image that is pin-sharp at full size on a laptop can be soft on paper, and this is not a trick of perception: the paper is simply showing you detail the screen was never able to render in the first place.
Zooming to 100 percent in your layout application helps, because it shows the image at its true pixel size rather than scaled to fit the window. The most reliable check remains a printed proof, which is also the only way to judge whether a borderline image is acceptable for the book you are actually making.
When resolution arrives with other faults
Low resolution rarely travels alone, because the images that cause it usually came from the web, and web images are also RGB. A single placed photograph downloaded from a blog can trigger a resolution failure and an RGB color space rejection at the same time, and if the cover is dark it may push total ink coverage past the limit too.
Printers report one fault at a time, so these arrive across several rejections rather than in one list. That pattern is the subject of why your file was rejected a second time for a different reason.
Frequently asked questions
Why does my image say 300 DPI but the printer still rejected it?
Because the DPI value stored in an image file is metadata rather than a measurement. What the printer checks is effective resolution, which is the pixel width divided by the width the image actually prints at. A 1800 pixel wide image is 300 ppi across 6 inches and 200 ppi across 9 inches, and the stored label says 300 in both cases.
How do I calculate effective resolution?
Divide the image's pixel width by the printed width in inches. A 2400 pixel wide photograph placed across 8 inches prints at 300 ppi. The same image across 12 inches prints at 200 ppi. In InDesign the Links panel reports this directly if you turn on the Effective PPI column.
What resolution do IngramSpark and Lightning Source require?
300 ppi at final printed size for color and continuous tone images, and 600 ppi for 1-bit line art. Interior images below 72 ppi are refused, and cover images below 200 ppi may be refused. Amazon KDP recommends 300 DPI at final size and treats anything under 200 DPI as low resolution.
Can I just upscale the image to 300 DPI?
Changing the number in the resolution field adds nothing, because it does not add pixels. Interpolated upscaling produces a bigger, blurrier image rather than a sharper one. AI upscalers are better and can work at moderate enlargements, but they invent detail rather than recovering it, which is a real risk on faces and lettering. Going back to the original full-size file is the dependable fix.
Why do covers fail resolution checks more often than interiors?
A cover is one continuous sheet spanning the back, the spine and the front, so a 6 by 9 in paperback wrap is around 12.5 inches wide before bleed. An image that is sharp as a 4 inch figure inside the book has to stretch three times further on the cover. The rejection floor is also stricter on covers, at 200 ppi rather than 72.
Does a higher resolution always make a better book?
No. Past roughly twice the line screen, which puts the useful ceiling near 300 ppi for interiors, extra pixels add file size and processing time without adding anything visible. KDP notes that images with extremely high resolution can cause processing timeouts. Line art is the exception and genuinely benefits from 600 ppi.
Stuck on a rejected file?
File Fix diagnoses every reason your file was refused, not just the one the printer named. Diagnosis back in three to five business days, from $99.
Get your files fixed